Alienware 13R3 Review

While my VR development has been a bit sidetracked recently (one guess why), with the release of Nvidia’s Pascal 10-series mobile GPUs, I’ve been looking forward to abandoning my previous portable VR workstations and switching to a more traditional, relatively compact laptop.

I was originally most interested in the Aorus X3 Plus V6, but its release was so delayed, that I ended up preordering the Dell Alienware 13R3 when it was announced in November. Due to some discount hijinks (and the fact that it hadn’t shipped when it was scheduled to), I ended up reordering during the Black Friday sales. Delivery was originally scheduled for Dec 5, but got pushed back until the 22nd, by which time I was already out of the country, so I only this week finally had a chance to break it out and put it through its paces.

So, first, some positive things:

  • OLED screen – the main reason I decided I wanted the Alienware 13, despite the long wait and a few other concerns, was because of the screen. While only 60Hz, the OLED pixels really are glorious – sharp, contrasty, with 1ms switching and a ridiculous color gamut (104% AdobeRGB). It’s a capacitive multitouch screen (I don’t like to touch my screens but the one time I accidentally did, it seemed to work), and it’s mounted on a very solid hinge that doesn’t not wobble *at all* when typing. There is an achilles heel, but I’ll save that for the ‘cons’ section.
  • Good performance – If you order the 13R3 now, you’ll get the latest Kaby Lake (7-series) processor – mine was in the one-month window where the Skylake (6-series) shipped, however the performance difference is minimal (the Kaby Lake might have an ever so slightly better boost clock). I got mine with the highest specced i7-6700HQ that despite worries due to thermal problems in many early subreddit threads, ended up running fine. CPU stress tests clocked it at about 75-80C running at a boost clock of 3.1-3.2GHz, with even lower temperatures undervolting w/ Intel XTU. Sadly, when running benchmarks like Valley or gaming, the system still ended up being about 20% slower than my compact (stock) i7-4790K and GTX970 combo, but I doubt that any other GTX1060 based portable system would do much better (the GPU clock of the GTX1060 didn’t boost to 1900MHz, but stayed a reasonable 1600-1700MHz at around 80-85C while gaming).
  • The keyboard and trackpad were top notch, both in feel, and surprisingly, with the lighting on the trackpad (this is configurable, but by default the trackpad glows when in use and it’s actually pretty neat). The top plate is a soft touch plastic that is nice, although even over a couple days of light use, has started to acquire a few spots of sheen (ick, I know).
  • The Webcam has IR support for Tobii eye tracking (never used) and Windows Hello logins (which actually works great and is delightful)
  • Build quality is super solid – it’s built like a tank and it feels like you could definitely use it as a bludgeoning tool and then continue on your merry way. It’s also worth noting that swapping RAM (2 slots) or m.2 SSDs (2 slots) is a breeze – literally 5 phillips screws on the bottom, which is a big plus. The service manual is online, and overall, near complete disassembly looks like a breeze.
  • Due to the delays, I ended up calling Dell customer service a few times, and while not always completely helpful, I didn’t have to spend too long on hold and most of the time it felt like they were moving the ball along, so kudos for that.

OK, now with the cons, which includes some pretty serious stuff, sadly.

  • The screen – As I mentioned, one of the main reasons I picked the Alienware 13 over anything else was the OLED screen. And it really is glorious – as long as you are in complete darkness that is (that Achilles heel I mentioned). Even in indirect or low ambient light, the screen is basically a mirror, and if you like running dark text terminals like me (which would also be better for the OLED’s battery life), you will spend a lot of time staring at your own reflection. I really can’t fathom why someone would have such an otherwise awesome display and then put it behind such a glossy piece of glass.
  • Size and weight – While the build quality is admirable, and in theory I knew it was heavier than some of the alternatives, it’s not until you get it in your hands do you realize how bulky it really is. The computer itself is 2.5kg (5.5lb), and the power brick is another 0.8kg (1.7lb) on top of that. In total, you’re looking at almost 3.3kg (7.2lb) for the package. The sizing isn’t much better. It’s relatively thick at about 24-27mm (the other dimensions aren’t super small either), but worst of all, the center of the laptop is actually pointy, not flat. This makes propping the laptop up or using many laptop stands a non-starter. I don’t really know what Alienware was thinking with that design element.
  • Battery life – shorter battery life is something that I expected but in practice, turned out to be unacceptably low (much lower than reviews and claims I had seen) 84t92ao. In my unscientific rundown test of random web browsing and YouTube video watching, I got 3h 10m of use from a full charge before it shut down. This was in a darkened room and I don’t think I heard the fans turn on once mind you, so I don’t think it was stressing the system (also, w/ the OLED screen, you can’t disable Optimus, so I assume it wasn’t working out the dGPU even).
  • I paid a few bucks extra for the Killer 1535 (vs 1435) network card, which is supposed to have solved some of the older 1435’s connection problems. I also uninstalled the Killer Suite and reinstalled just the drivers, as that’s supposed to help as well. Alas, for whatever reason, the 1535 would drop connection (well, remain connected but time out on packets) about once a day. I have half a dozen devices running on my AC wifi without issues, so I’ll lay the blame on the card – it’s a relatively minor issue since it’d only be about $30 and 5 minutes to swap it out w/ an Intel wifi card, but I figure I’d mention it, while I’m piling on.
  • As I mentioned, there’s some minor throttling under gaming loads (1600-1700MHz on the GPU vs the 1900MHz max boost), although angling the laptop for better ventilation didn’t seem to improve things much. I also noticed some minor occassional graphics memory corruption in certain overlays in the game. Note: performance improved by about 10% after updating to the latest Nvidia WHQL drivers. There’s probably more I could have done to tweak out performance, but the screen, life, and bulk really killed my enthusiam

As you might expect, after a few days realizing some of the shortcomings, I’ve ended up deciding to return the system. I think for those that don’t fly/travel as much, or that don’t mind extremely glossy screens (there must be a lot of people like that, because I feel like Dell isn’t the only offender here), this might be a good fit. There really are a lot to admire here, and the reviews that I read/watched were mostly positive, so I don’t want to give the impression that this laptop is a total stinker.

For those looking at lightweight/portable VR capable workstations, your options are still sort of limited. I’ve ordered a Gigabyte Aero 14 that will hopefully address the worst issues I had with the Alienware 13 – it has a matte anti-glare IPS display (sadly w/ average color gamut), is 1.9kg (the 2.4kg weight with the power adapter is the same as the weight of the Alienware laptop by itself) and is almost 50% thinner. It also has a beefier 94Wh battery (Gigabyte has made claims for 10 hours of use, but honestly, I’d be happy if it could hit 5h of web browsing) and an Intel 8260 wifi card. Gentech is also offering a free liquid metal CPU+GPU repaste so I have some hopes that performance might actually be a bit better as well.

Here’s a couple video reviews of the Alienware 13:

(Just look at that glare in the Linus video – he doesn’t mention it at all)

Oh, and here’s some Aero 14 Reviews
Year End Donations

This year, I’m donating to more causes than usual. Just sharing this in case anyone is looking to do the same.

Lightbulb Math in 2016

I ran across this 2015 article on LED light bulbs in my Twitter feed today, and it reminded me of a short post I made… over 10 years ago now running some numbers on power savings from replacing 60W incandescent bulbs with 13W CFLs. I figure it might be worth running the numbers for 2016.

  • Home Depot sells a 4-pack of 60W Equivalent LED bulbs for $7.97 ($1.99/bulb). These are 2700K soft white, 8.5W, 800 lumens bulbs and are rated for 10,000 hours
  • Note, this is actually cheaper (and brighter) than the cheapest reasonable 60 Watt Incandescent A19s I could find. These are 2700K soft white, 60W, 630 lumens bulbs rated for 3500 hours (pretty good!) and cost $4.97 for a 2-pack ($2.49/bulb).
  • Philips also sells a 60 Watt Equivalent Halogen A19 4-Pack for $6.97 ($1.74/bulb). This is 2720K soft white, 43W, 615 lumens, rated for 1900 hours.
  • The EIA publishes detailed average electricity pricing – the national average is about 13 cents/kWh. Prices vary widely (as low as 9.5 cents in WA and LA and up to 27.8 cents in HI). The cheapest residential electricity rate I could find is in Chelan County, at 2.7c/kWh. They also provide Gbps Fiber. (This wouldn’t be a bad place to set up a mining farm.)
  • Before we calculate the power-inclusive cost, lets just total bulb replacement cost based on rated lifespan. The LED bulb is $1.99/10K hours, the incandescent is $7.10/10K hours, and the halogen is $9.17/10K hours. It’s somewhat surprising, that even if electricity were free/infinite and a non-issue, the LED bulb would still be over 3X cheaper than the incandescent now (post 2014 phaseout, prices will probably keep going up if you can even find standard incandescents).
  • Now, lets look at power over the same 10K hours using the 13 c/kWh average rate. The LED light bulb would use 85kWh, costing $11.05. The incandescent would use 600kWh, costing $78. And the halogen would use 430kWh, costing $55.90
  • In my 2006 post, my 110M household number stats was actually probably outdated/from previous years. In any case, Statista pegs 2015’s households at 124.59M, we can conservatively ballpark 2016 household numbers at 125M
  • We can now do a 1:1 update of the 2006 numbers. Replacing a single incandescent light-bulb per household with an LED bulb (probably a lot less common now), you would save approximately $9B over the lifetime of a single LED bulb
  • When looking at the power usage, say taking the 5 hours/evening usage from the old post (1826.25 hours/year), we end up at just under 12M MWh power savings, or about 1.5 1000MW nuclear power plants
  • Based on a ballpark distribution cost of $250M (assuming bulb+handing out bulbs = retail cost of the bulb), we end up at about $21/MWh saved, far cheaper than USD/MWh costs for any type of new power plant.

Misc notes:

  • Incandescents are almost impossible to find these days, besides as specialty/decorative versions. These vintage quad loop ones are pretty neat.
  • The LED bulbs linked above are CRI80 while the incandescents/halogens are CRI100. A high CRI (90, 93) LED bulb runs at about $4 or $5. Either way, they should in general be more pleasant than most CFLs from last decade.
  • GWB signed the EISA that had a low-efficiency incandescent phase-out (triggering the introduction of halogen alternatives, more about that here and on wikipedia)
  • Chelan County actually looks quite pretty
  • I think I had the savings cost off on my original post (fixed now I hope). Math! ¯\_(ツ)_/¯

The Morning After

In 2004, I was in NYC right after the election. Kerry had lost and Bush had just been re-elected, and I was at a gathering of young progressives and civic hacktivists trying to come to terms with what had happened, and to make plans for the future. The event was cheekily entitled “the mourning after,” although it didn’t feel like much of a joke at the time. In 2008, I worked on digital infrastructure for the Obama campaign for the final push (the end of the primaries to election night), the results of which, looking back, were a bit of a payoff on work that had started four years prior.

Part of the shock from yesterday I think was from people assuming Trump couldn’t, or at least, wouldn’t win. Maybe this was how some felt back in 2000 (my first elections, while I was in college – I don’t think I have a proper perspective) – there was a lot of fear and uncertainty back then, although more about policy, then perhaps any potential danger to core principles and institutions of the republic.

I’ll be collecting my thoughts over the next couple days and will be updating this as I go along.

As far as the election itself, I don’t want hem/haw or overanalyze – I’m sure over the weeks, there will be plenty of punditry covering it from every angle, but it’s important to put things in perspective. Clinton and Trump basically tied – final voter turnout/votes are still to be counted but here’s a quick per-candidate comparison to 2012 and rough totals for the past 4 elections – overall turnout down 4M from 2012, 6M from 2008 (the recent highwater mark of 57.1%) – According to the Federal Register, 2015 had a VAP of just shy of 248M (Pew demographic report), which would put total votes just north of 50% this year. Using those numbers, about 24% chose Clinton, 24% chose Trump, and the rest (half the country) didn’t care enough or wasn’t able to vote. It’s worth noting that there isn’t anything conclusive that can be said about how the majority of the country feels, because the majority didn’t vote (ok, maybe you can draw some conclusions from that). A tiny change in turnout or vote-location would have changed the results.

If there are any demographic takeaways:

It’s also worth pointing out that while the working class shift did tip the scales against HRC during the election (PA, MI, WI), the swing was only about 10%.

Michael Moore laid down that aspect of a couple weeks ago, to a tee:

We’ll see how that works out.

OK, with that out of the way… onto what a Trump presidency means in terms of… policy.

People to follow:

DJI Mavic vs GoPro Karma

Last week, GoPro announced its long-awaited drone, the GoPro Karma. The most compelling part is that it’s a modular system that includes the drone and a 3-axis gimbal that can be detached and used as a handheld. The product itself is super polished and includes a carrying backpack (w/ a chest mount no less) for a very reasonable price. For $1099, you get the system with a GoPro HERO5, which offers top-of-class image quality – honestly, GoPro’s promo vid, entirely filmed w/ GoPros, needs to be seen in high quality (youtube-dl -f 266+140 'https://www.youtube.com/watch?v=vlDzYIIOYmM') to be believed.

Today, DJI responded with the DJI Mavic, a foldable/portable drone that is smarter (it has all the obstacle avoidance and object tracking of the Phantom 4 and more) and incredibly small (folding into probably half the volume). It also has a (super-tiny) 3-axis gimbal and a camera that looks about on par w/ the HERO5 Session. It is $999 w/o a carrying bag/backpack, and neither the camera or stabilizer are modular (it also requires your smartphone to use for navigation vs the Karma’s AIO controller). Here’s the best hands on I saw today:

I’m definitely in the market for a travel drone, and while the Mavic’s stability is perhaps a question mark (UPDATE: looks good on Casey’s video), in almost every other way, it’s an obviously a better drone than the Karma, but if you are looking for more general (ground + air) filming, to get the same setup you’ll need to either pack your phone and spend another $300 for something like the DJI Osmo Mobile or for all-weather/action use, a stabilizer and an action camera (conservatively $500 total). As a do-everying solution, the GoPro Karma is compelling, even more-so when you consider that you can upgrade the camera separately. (While the HERO5 is w/o a doubt “the best GoPro ever,” honestly I was hoping that GoPro would end up offering an Ambarella H2 option for 4Kp60 10-bit capture and >60Mbps recording. Well, there’s always next generation.)

As of right now, I’ve preordered the Mavic, as the image quality is good enough, I don’t much care about the GoPro accessory or software ecosystem (both of which could be big pluses for some people), and I’m much more weight/volume than price sensitive. I sold some of the GPRO today that I bought a couple weeks ago to defray the costs (I’m actually still pretty bullish on GPRO and still long on it. Also, was pricey by the time I looked at it, but AMBA has been on a tear and maybe be the real winner from the drone wars.)

I’d like to start doing some more video in general, but I’m currently a bit undecided on the right mix of cameras. A m43 upgrade is almost certainly in the cards (the new Olympus EM1mk2 will do Cinema 4K 237Mbps recording w/ IBIS as well as a monstrous 15fps mechanical shutter for stills. The GH5 will do UHD 4Kp60 422 although details are sparse since it won’t be out until mid-2017), but I’m a bit unsure on what kind of stabilized (waterproof?) camera I’d want to go with, and whether there are any worthwhile stereo-180 or mono-360 cameras coming out (I’m tracking a bunch of options, just haven’t seen anything great yet).

UPDATE: The Karma does not fare well in this comparison:

UPDATE 2: Hmm, maybe not so terrible, the Hero 5 video quality is better and you’ll be able to upgrade the camera as well…

Happy Birthday To Me (What’s Shaking Leonard?)

I’m typing this on my flight from PDX-LAX today, although who knows when this will go up online and when you’ll read this. Time waits for no man and all that.

I am, however, writing this on my 36th birthday. I’m not big on birthdays – I never grew up with big birthday parties, so unlike some people, I never had too many rituals or expectations to be disabused of. On an intellectual level, I also have a bit of an objection to the arbitrary demarcation of an extra year being added to what is ultimately, just another day and so my emotional ambivalence probably also reflects some of that. (or vice versa?)

Still, significant dates do have subjective value, and at the end of the day, that may be the ultimate rubric, not to get too existential about it. Of course, the mechanistic and objective processes of reality transpire no matter how you feel about it… Well, I’m going to stop with the metaphysical caveats just so I don’t spend the rest of this post rat-holing into matters perhaps best discussed in either full earnestness or inebriance.

I’ve never been much on public journaling (or journaling in general). Despite a (self-perceived, at least) predeliction for deep inner-dialogue, it’s not something I tend to present or share, but I’m in a bit of a contemplative mood, as perhaps some others are, after this (possibly? probably?) last XOXO Festival, so I’ll indulge myself a bit today.

For those of you that are unfamiliar with XOXO, Casey Newtown wrote a fantastic summary on the Verge, Matt Haughey also wrote a bit about it, or for a more involved, thematic take, Frank Chimiero wrote a piece, The Inferno of Independence, after 2013’s XOXO (that Andy requested he present as the possibly-last-ever XOXO talk). You can also view the Netflix Original (based on the true story) movie of the Festival. Here’s the trailer:

Like Matt, I’ve been to every XOXO. I’ve been pals (that may be a bit inadequate of a descriptor) w/ Andy for a really long time, so I also get a bit of inside baseball sprinkled in with my experience, but looking back, it’s been pretty amazing and inspiring seeing XOXO grow and evolve over the years. While there are many things that XOXO is about and that XOXO did, for me, the most magical accomplishment, the thing that seems to be quite rare, was creating an environment that unabashedly encouraged (practically reveled in) vulnerability, empathy, and embracing the feels, or feelings as we called it back in the 20th century.

There’s a lot of joy, from the warm nostalgia of catching up with old friends, or the excitement of sharing and discovering awesome new projects and people, but also the sharing of the financial, emotional and psychological distress (not to mention downright toxicity on the Internet) that seems to come with being indie and creating things these days. There’s the awkwardness and discomfort of trying to find something to say to people whose work you admire (or whatever that feeling is when you decide simply not to instead), and the occasional emotional and intellectual exercises in empathy and sensitivity as you try to navigate the sometimes fuzzy, arbitrary, contradictory, or just plain hypocritical edge-cases of applied intersectionalism. It’s messy and challenging, and there’s a reason that “processing” seems to be a term that’s thrown around a lot post-XOXO. And of course, why people love it so much.

In any case, it’s been a great excuse to spend a week in Portland the past few years, and early September often seems like the perfect time of year there. The first year, XOXO literally overlapped with my birthday, and I guess since then, I’d come to treat it as a bit of a birthday gift to myself. So thanks, XOXO, and PLUR.

I should mention, by way of context, for those that are for some reason reading this and who don’t know me (hi internet), that I’ve been wandering around (vagabond, nomadic) coming on three years now. I (very) intermittently keep a travel blog here for those interested. My current plan is to take a short breather to try to clear out some of my 2m x 3m storage unit, and to build/buy a kick-ass drone (Karma? Mavic? oether?) before I continue on.

This is getting quite long, but as this is sort of a State of the Leonard type post, I’d be remiss if I didn’t talk a bit about what I’m up to.

Lensley turns… 8 this year (I think?) and soldiers on (or abides, whevs). I don’t think it’s much of a surprise to say that it’s consumed less of my time and energy these past couple of years.

Back in 2006 I wrote some 5 year tech predictions that weren’t too bad. I didn’t repeat it in 2011, but I did quietly start making some notes on things that were catching my eye in 2014. Some of my recent posts reflects some of those interests. I’m in the process of creating a new umbrella for some of these interests, so expect to see more about this over the coming months.

This is getting quite long (and finishing this up, quite late), so I’ll continue with things that I’m digging (and things that terrify me) in another post.

New Tricks

By my count Lensley is going into year 8 (jeez) but despite working with all kinds of image and video processing over the years, I only just finally got around to sitting down and grokking ffmpeg’s filter_complex this past week.

While it’s conceptually simple, the syntax documentation is rather dense and unintuitive. Web searches will let you find how to do any number of things, and you can hack your way for most stuff (in the past I’ve used h264_mp4toannexb, various intermediates, and concats to chain things together for example), but recently I found two writeups that were particularly useful in breaking down how -filter_complex works:

One thing to note is that image2’s frame inputs remain stubbornly limiting and it’s tempting to simply do image manipulation externally to pass in, but doing it all in ffmpeg was at least 10x better performance than using ImageMagick for preprocessing. ffmpeg is just stupidly fast. I simply end up writing temporary symlinks and calling the ffmpeg bin, but you can also now conceivably use PyAV in Python which has just recently added filtergraph access to its libffmpeg/libav bindings.

Related: fantastic writeup of optimizing animated GIFs w/ ffmpeg

Another recent “I probably should have sat down and figured this out years ago” moment was finally figuring out single-line multi-hops. I’ve been an “intermediate” level SSH user for a while now, figuring out SOCKS proxying and autossh-based tunneling a long while back. All our Lensley machines automatically reverse tunnel to our config servers and I have both ssh configs and various portmapping scripts to make connecting relatively easy.

However, my access (whether it be connections, port forwarding, or file copying) has always required an extra step for chaining until I stumbled on a post about multi-hop proxying. Now that particular description is confusing as hell, but the secret is in the -t part of the command. Here’s a much clearer description. So now I have a script that lets me connect to a reverse tunneled machine in one command that looks something like:

ssh -t server ssh -t localhost -p $port

Of course, there’s more than one way to skin a cat, and it looks like OpenSSH 7.3, released just a few days ago, has just added a ProxyJump command that makes life easier.

That script I wrote also tests first to see if a machine is available on the local network using curl (better than ping I think. netcat -z would be preferable but even w/ time-out set to 1, it always takes 5 seconds to time out):

curl --silent --fail --show-error --connect-timeout 1 http://$host.local:22/ 2>&1 | grep timed

File Compression Tools

It’s been a long while since I’ve spent much time thinking about file compression tools, but I was running out of space on one of my smaller SSD’s and the culprit was mainly lots of large multi-GB TIFs and PSDs that had accrued in our Lensley Dropbox.

My first thought was xz, since it compresses super well, but I was growing old waiting for files to compress and decided to switch. lrzip seemed like a good option, and performance was much better than xz, and threaded (and with multi-file support and a nice progress UI to boot), but I also happened on another compressor shoot-out page (if you’re interested in this topic, definitely read this, there’s a lot more testing and nice pros/cons list for the apps) which concluded that lbzip2 was a good choice.

I gave it a spin, and sure enough lbzip2 is great. With defaults, it loses a few percentage points when compressing vs lrzip, but it also compresses on average twice as fast, with the kicker being that its archives are fully cross-compatible with bzip2, so pretty much any system can access the archives by default. I’ll be aliasing bzip2 to lbzip2.

(If speed isn’t as important (batch compression) and for max compression of large files, lrzip is probably better. Although a lot of people have been using xz, even with multithreaded support, I still didn’t feel performance was great so for personal use, I’ll probably end up mostly using lbzip2 or lrzip from now on.)

DIY Backpack VR System

After my writeup on battery powering a (portable) PC, I meant to publish this last part shortly after, but ended up with some IRL distractions and have been putting it off since I never ended up really polishing up the mounting. This is way overdue, and in any case, this writeup is much shorter (honestly, almost all the hard stuff is just getting the PC power set up) so I’m just gonna send this out.

When I started this project earlier this year, there wasn’t much out there on backpack VR rigs, and while I still haven’t seen many writeups on DIY rigs (here’s one), several manufacturers have now started to show off VR-targeted backpack/backtop systems:

I’m sure there will be more details (maybe even systems from more manufacturers) this week at Computex. I’m most interested in HP’s system and it has a great looking form-factor and will have hot-swappable batteries. The GPU it uses has yet to be announced – I wonder if it’s a new AMD Polaris part (from what’s leaked so far, AMD is aiming to have relatively low power (100W TDP?) mainstream parts that meet VR min-spec performance.

If you aren’t interested in making a DIY rig, or want something a bit more polished, I highly recommend keeping an eye out, as I suspect this will be a pretty crowded space soon.

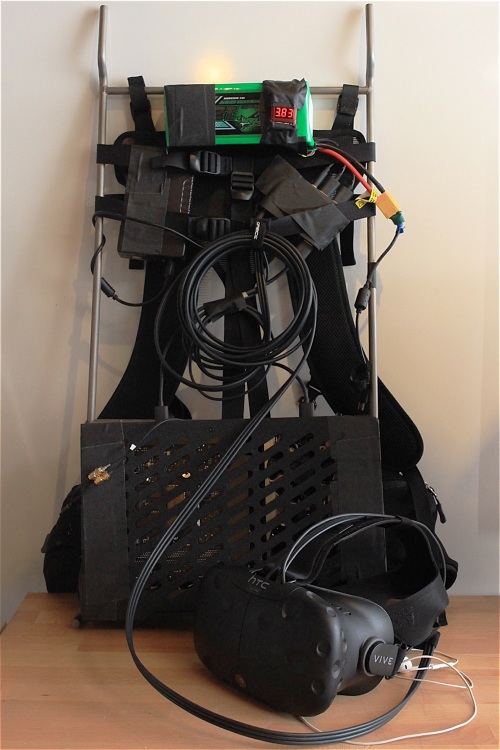
In any case, on to the build details. Probably the biggest reason I’ve been putting off publishing is while all the parts are there, I never got around to polishing up the mounting (which would probably involve cutting some acrylic plates/3D printing some fixtures), but it’s time to just get on with it. Here’s what the backpack rig looks like:

DIY VR Backpack

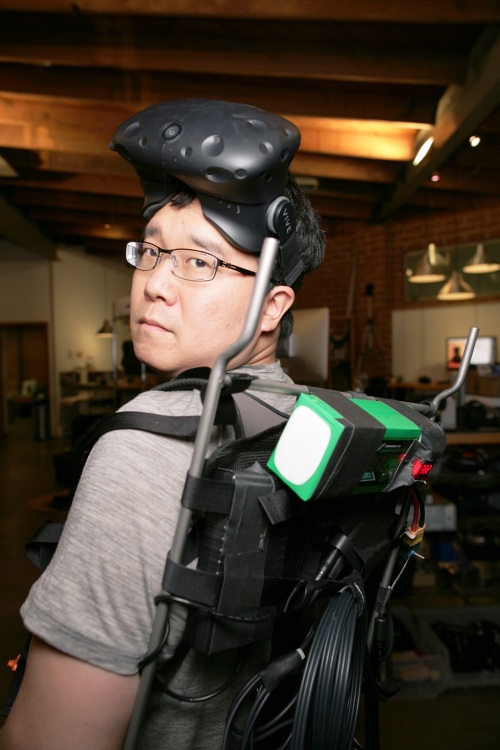
It weighs in at just under 7kg (about 15 lbs) in total (including the Vive components, it’s closer to 5kg w/o), and is surprisingly comfortable when put on. As you can see it’s pretty rough looking – mounting is all just plenty of gaff (the solution to everything that duct tape doesn’t cover) and there aren’t shorter HMD cables available right now, so that’s just looped up. I’m actually also using the link box simply due to the lack of a proper adapter (the HMD/link-box uses a 1.3×3.5mm plug which requires 12V DC power, more on that later).

Here’s the parts run down:

I’m using a Vargo Ti-Arc backpack frame. The full pack is $400, but I was able to buy the frame by itself for $225. I got it because it’s ridiculously light (755g), but having done the mounting now, I suspect I would have been better off with just an ALPS OutdoorZ frame ($80) or even a plain old A.L.I.C.E. frame ($44). For anyone making their own system, I recommend using an open frame so you don’t have to worry about ventilation/heat management.

Due to the way the S4 Mini case works (if you haven’t seen it btw, that Glacier White version is sexy af), you have to point either the CPU or GPU fan into your back. I chose the CPU side, since most VR apps are GPU bound, and it does get a bit toasty after a while. If I were seriously building a backpack rig, well, I’d probably look at taking a gaming notebook apart first, but if on a budget, I’d look at a DTX board w/ 90 degree angled PCIe which would allow the CPU and GPU to both radiate properly.

As previously mentioned, the Vive requires its own 12V power, and since I don’t have any fancy power management for my main system battery, I simply bought a separate cheapie 6000mAh 12V battery ($30). (Note, for a proper build, you could just use use the 12V output from a spare Molex connector from the HDPLEX power board.) I originally wasn’t sure what size DC plug I needed so I just bought a random set of plugs, but if you are looking for the exact plug, you’d ideally want a 1.3×3.5mm female to 5.5×2.1mm male connector. Sadly most of my EE gear is packed up so I don’t really have good measurements for how much power the Vive HMD actually uses in typical VR content.

The last thing you’ll want to do is to disable Steam from automatically launching and instead have SteamVR load at startup. This is pretty easy to do, and once that’s done, you’ll be able to strap the backpack on, and then boot straight into VR. Steam’s Desktop mode works fine w/o any sort of headless ghost. A wireless keyboard/trackpad of some sort is a good idea for input.

So, this is still a fairly involved process (even strapping on a ready-made backpack system might seem dubious) so it might be worth answering the question of “is this actually worth doing?”, and the answer it turns out is, yes, absolutely! The actual experience of having full positional tracking, and being completely untethered within a walkable space is quite frankly, awesome. If you’ve used the Vive much, you’ve probably developed a good “cable sense,” which seems fine, but it’s not until I didn’t have to worry about the cable at all that I realized how much that affected my experience. While a backpack probably isn’t the best for very frantic experiences like Audioshield, for more sedate activities, like hanging around the reef in theBlu or, drawing in Tilt Brush, it’s great. My experiences w/ a fully untethered, tracked VR leaves no doubt in my mind that it’s the way it should be (and has to be, for mainstream adoption), and it’ll be interesting to see where mobile and desktop VR meet.

Obligatory backpack selfie:
backpack selfie!

Note: due to the Rift’s USB 3.0 (required!) camera-based tracking, it’s not currently possible to have an untethered, tracked Oculus experience, as there are no wireless USB 3.0 solutions available (I’ve looked very hard. There are a couple USB 2.0 solutions, and there’s a WSE spec, but no products or even devkits I could get my hands on).

UPDATE: Actually, there’s probably still some good reasons to DIY-build vs buy. More details have come out, and it looks like MSI’s backpack unit which is closest to production is targeted at a very loose 2H16 (holiday season from this report) release date and expected to cost $2-5K at launch. HP’s Omen X VR pack is supposed to be a devkit that will start trickling out this month, but there’s no mention of any consumer release date or pricing. Also, while the press pics have shown it as a tiny unit, the batteries are on an external holster, which is decidedly less sleek. Zotac’s backpack looks like it simply packs a flat mini-ITX system into a mesh backpack and there are no details for release. It’s worth noting that I went back and specced out the price for a full DIY backpack system, and it comes out to under $1300, so that’s something to keep in mind if manufacturers are selling their backpack systems for $2K+.

Update: commercial options (late 2016)

You’re probably better off ordering a TPCAST for the Vive (~$220) than building a backpack PC atm.

Mounting and Copying iPhone Photos via CLI on OS X

Lately, except for the very occasional iTunes full backup, I’ve just been intermittently copying photos from my iPhone via my Linux machines, mounting with Thunar and gvfs.

Recently, I had reason to do a bit of poking about, and it turns out that libimobiledevice, and more specifically, ifuse, is the way to go for scripting. ifuse will mount your iOS device as a virtual file system, and let you copy photos and other media via regular command-line tools like rsync (it can mount the root file system only if your phone is jailbroken). If you want to get this working on arch, it’s very straightforward. You can add a udev rule and basically script to your hearts content. (I’ll probably set up an rsync backup script sometime.)

ifuse also runs on OS X fine, and while installation is a bit more involved, it worked perfectly for me running El Capitan 10.11.5, MacPorts 2.3.4, and osxfuse 2.8.2.

Once it’s installed, you can just run ifuse [/pick/your/mount/folder] and you’re ready to go.

Performance isn’t spectacular, but is reasonable, rsync runs at about 10-15MB/s via USB 3.0 on a Core i7 Mac Mini.